21 October, 2012

~Happy Birthday Cupcakes~

This Happy B'day Cuppies nice rite? Made this cuppies for a friend just to wish her have a "Happy Birthday" BUT this is 2 months ago, i think she is waiting me blog this cuppies!! Just 'dig out' the photo edit and blog!!
Just a simple cake with whipped cream and deco with some Chocolate rice.Print some 'Happy Birthday' tag stick on a toothpick ..Done....

Simple butter cake recipe (10 small cupcakes)
Ingredients:-
**90gm butter
**65gm castor sugar
** 2 eggs 
** 1tsp Vanilla Extract
**45ml milk
**120gm cake flour / self rising flour (sifted)

Method:-
1. Beat butter with sugar till fluffy.
2. Add in egg one at a time till well combined.
3. Add in vanilla extract and milk.
4. Add in flour mix well.
5. Scope in paper cups.
6. Baked at pre-heat oven 180C for 25mins
7. Cool the cake on wire rack.
8. Deco with whipped cream or any topping you LIKE.

14 October, 2012

Red Velvet Cupcake

I totally forgot i bake this "Red Velvet" before when last week my cousin ask me why i didn't update my blog i just remember i not yet blog this "Red Velvet Cupcake".I know this Red velvet cupcake from my cousin, she keep on tell me "jie,,,u go find this red velvet recipe lar, this cake very nice". I just keep in mind , also don't know how the cake looks like until one day i 'surf' and found a blogger Nasi lemak Lover (i love her blog ) share it. I read the recipe...OMG red coloring .which i don't like.I just keep quite and go search for natural red color substitute. On the web they say use beet powder i ask around none, so i use another substitute "Red yeast Powder". Since i got the red yeast powder ,i can start to bake this cake. the color of the cake  not really 'Red' due to not using 'Coloring'...to me the important thing is the taste not the color...hahahaha...
Finally, i bake it and the taste i really like it....especially my little nephew! Cake soft BUT the cheeses topping i beat not hard enough!!

Recipe from "Nasi Lemak Lover" blogger
Red Velvet Cupcakes with cream cheese topping
Ingredients:-
**Cake flour 150g
**Baking powder 1/2 tsp
**Salt 1/4 tsp
**Cocoa powder 1 tbsp
**unsalted butter 80g  (at room temperature)
**Caster sugar 120g
**1 large egg
**Vanilla extract 1/2tsp
**1/2 cup buttermilk, at room temperature
 (Buttermilk substitute 1/2cup milk +1/2tbsp lemon juice, set aside for 5mins)
**1 tbsp liquid red food coloring (I use 2tbsp red yeast powder)
**1/2 tsp white distilled vinegar ( I use white rice vinegar)
**1/2 tsp baking soda
Method
1. Preheat oven to 180C. Place cup cake liners on a baking pan.
2. Sift flour, baking powder, salt and cocoa together in a bowl. In a jug, stir the red colouring      into the buttermilk. Set aside.
3. In the bowl of an electric mixer, beat the butter and sugar until light and fluffy. Beat in egg, followed by vanilla extract until the mixture is smooth.
4. With the mixer on low speed, alternately add the flour and buttermilk in 3 additions, starting and ending with flour. Mix until evenly combined.
5. Combine vinegar and baking soda in a small bowl until it fizzes. Quickly add to the batter and fold through briskly until evenly incorporated.
6. Pour into the prepared cupcake liners and bake in the oven on the middle rack for 25mins or until a skewer inserted comes out clean.
7. Remove from oven and let it cool a wire rack.
8. Apply cream cheese for topping and serve. (But i prefer after chilled it)

Cream Cheese Topping
**150g     cream cheese( at room temperature)
**40g       butter (at room temperature)
**70g       icing sugar (sifted)
**1Tbsp   lemon juices
**Finely grated lemon zest from 1 lemon
Method
1. Beat cream cheese and butter till light and creamy.
2. Add in icing sugar and mix well on low speed.
3. Add in lemon juices and lemon zest, combine well.
4. Store in fridge for later use.

Cake texture , taste and the cream cheese topping ......I LIKE It!!


09 October, 2012

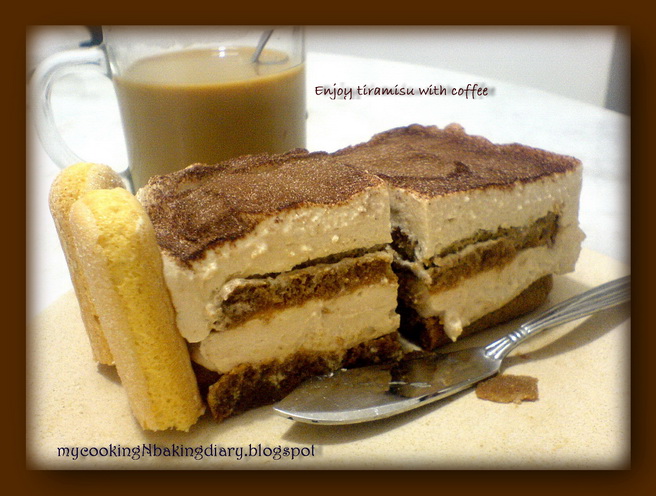
~Tiramisu~ ( Simple Version)

After Mid -Autumn festival i rest ....stop baking !! my cousin ask me "jie, why u no update you blog?"I say...need a REST....hahahaha .excuses !!
Last week i borrow a Rasa magazine from Library.saw this Tiramisu quite simple no need Kahlua since i have a packet of "finger Biscuit; so try it out! I scan out the recipe but is in Malay ..i will write down my 'English Version' coz i do half of the recipe.


My Version below are:
**I use normal Philadelphia cream cheese since the chef say can use other cheese**
-150gm cream cheese
-100gm whipping cream
-10pcs finger biscuit
-4 TBSP icing sugar
-2 tsp Nescafe
-130ml Hot water
-some chocolate powder

*Pour the hot water in a small bowl add in 1Tbsp icing sugar and 2tsp nescafe stir it well
*Dip the finger biscuit into the nescafe let the biscuit absorb the nescafe put aside
*Put cream cheese and 2Tbsp icing sugar in mixer beat it in high speed till fluffy and add in
 whipping cream beat till soft and peak.
*Now can 'assemble' the cake...
  I use a square container (can assemble it into a glass as shown above) put the finger biscuit then follow by a layer of cheese mixture then finger biscuit again and cheese mixture ..my cake is 2 layer biscuit and 2 layer of cheese. the top layer must be cheese mixture and put some chocolate powder on top or some fruits for decoration. Chilled it before serving! 


~Coffee N Cake~

29 September, 2012

~Happy Mid-Autumn Festival~ 中秋节快乐


 Wishing all of You "Happy Mid-Autumn" 
祝大家中秋节快乐
~~月儿圆, 饼儿圆, 人人都团圆~~

 Yes, finally is end....finish baking mooncake!!
Today last batch 'Snow Skin mooncake" (Ping Pi Mooncake)
Actually, me enjoy bake the mooncake!!

昨晚,终于烘完最后一批上海月饼,今早也将月饼一一送完!!
下午做完冰皮月饼就收工了,有点累但我‘很享受过程“。。哈哈。。


18 September, 2012

Golden Syrup


Golden syrup is important for doing mooncake. It need to keep , the longer you keep your mooncake
color come out nice texture good. Want to say sorry....i lazy to type the step!!below links they share very clear how to cook 'Golden Syrup'


~Mooncake~

Mooncake / Mid Autumn festival coming soon.....A lot bloggers post their traditional mooncakes, Ping Bi mooncake, Shanghai mooncake, Jelly mooncake.... all look very nice!! Make me thinking 'i also want start do mooncake".....in my mind since i got the 'Golden syrup' why not try do some 'mini size' mooncake...
So i start cook red bean paste and my mini traditional  mooncake "not bad" for the 1st trial!!!
The paste just nice not sweet. For Ping Bi the skin i just bought from ingredient shop the premix flour!

So for those want do mooncake still have time....hurry up!!! bake it!!!

Recipe for mooncake skin
~90g  Golden syrup
~45g  Cooking Oil (i Use Knife Brand)
~1/2tsp Alkaline Water
~1/2tsp Baking Soda
~125g   Plain Flour
** Filling can buy ready made, for this mini moocake i use red bean paste (i cooked myself)

Method
1. In a mixing bowl, mix Golden syrup,Oil and Alkaline water,stir it and leave aside for 5 mins.
2. Add in Plain flour and Baking soda , mix well , cover it , let it reast for 75mins.
3. If the dough very sticky , add in some flour.
4  This mini mooncake i use 22g filling and 18g skin.
5. Wrap the filling with the skin put in mould slowly knock out, place on baking tray.
6  Bake in preheated oven @ 160C for 10mins take out brush egg glaze then bake another 15mins.

**Egg glaze - one egg yolk with 1/2 tsp water


~~~~~~~~~~~~~~~~~~~~~~~~~~~~~~~~~~~~~~~~~~~~~~~~~~~~~~~

 Ping Bi (Snow Skin Mooncake)
Recipe and how to do
* 250g Ping Bi Premix Flour
* 60g Shortening
*170g icing sugar
*150-180ml water
can add color or flavour
 **Just mix all the ingredients into a smooth dough
 ** Wrap in whatever filling you like
** Shape it whatever shape you like
Wait....cannot eat yet.....chill it 1st!!

Simple???? Try it out!!!


06 September, 2012

~~Cheese Tart~~


Ehm....If you love "Cheese"....You will Love it "Cheese Tart".
I still can remember when is my 1st time made cheese tart. In 2010 request from my cousin..
She ask" Jie, you know how to made cheese tart?" so....this jie jie try lor , bake the cheese tart bring it all the way from Penang to KL for her.....hahahahaha...
My eldest nephew also love it very much.....he can eat 4-6 in one time.....


What u need for Pastry (tart Shell)
    * 125g  Butter (room temperature)
    * 65g  Castor Sugar
    * 1  Egg yolk (cold)
    * 250g  Plain flour
    * 1 tbsp Cold Water
    * ½ tsp Vanilla Extract
for the Filling
    * 250g  Cream cheese
    * 20g  Butter
    * 60g  Sugar
    * 1  Egg

How to make Pastry (Tart shell)
   1. Cut butter in small cube.
   2. Pour the flour on the table top, use finger tips rub the butter with the flour till all flour coat with butter.
   3. Then add in sugar mix well with the flour and add in egg yolk fold into a dough.
   4. Add in cold water to knead into a smooth pastry dough.
   5. Wrap pastry with plastic and leave in fridge for ½ hour.
   5. Roll to circular shape and cut with pastry cutter line in tart mould.
   6. Using a fork, prick some holes on the base of  the pastry. Bake at 180°C for 15-20 minutes.

Filling
   1. Beat cream cheese, butter and sugar together till light, add in egg and beat till well mixed.
   2. Spoon mixture into baked tart shells.
   3. Mix 2 tbsp cocoa powder with a small amount of hot water.  Mix into a paste.
   4. Dip the tip of a chopstick into chocolate paste and draw some patterns on the top of the cheese.
   5. Bake at 180°C for 10 minutes.